Jouer avec les écrans LCD
Comment utiliser des écrans LCD ?
Sommaire
Matériel
-
 Wemos D1 mini - 2,35€ - https://fr.aliexpress.com/item/1pcs-D1-mini-Mini-NodeMcu-4M-bytes-Lua-WIFI-Internet-of-Things-development-board-based-ESP8266/32666984035.html
 - des cables - qq cts
-
 un écran LCD 128X64 - 2,2€ - https://fr.aliexpress.com/item/WAVGAT-Blue-color-128X64-OLED-LCD-LED-Display-Module-For-Arduino-0-96-I2C-IIC-SPI/32830523451.html
Prix pour un système : 4,55€
tuto
Que faire avec cet écran ?
Mode d'emplois
Installer la bibliothèque esp8266-oled-ssd1306 (depuis croquis -> inclure un bibliothèque -> gérer les bibliothèques puis tapez SSD1306 dans la recherche.
créer ses propres fichiers image à afficher
Faites une image en respectant ces règles :
- monochrome
- format PNG
- taille : 48 X 48 pixels (c'est la taille du logo du Science Hack Day mais l'écran faisant 126X
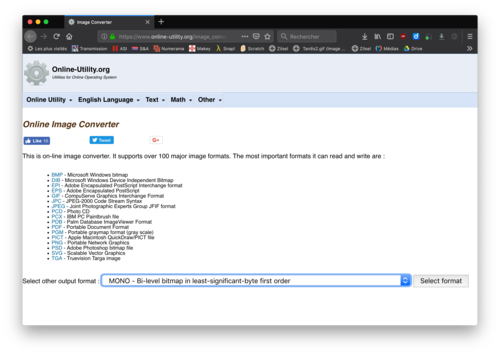
utiliser le site https://www.online-utility.org/image_converter.jsp
choisir "mono - bi-level bitmap in least significant-byte first order"
cliquer sur " select format"
importez votre fichier image
Afficher un logo Science Hack Day défilant
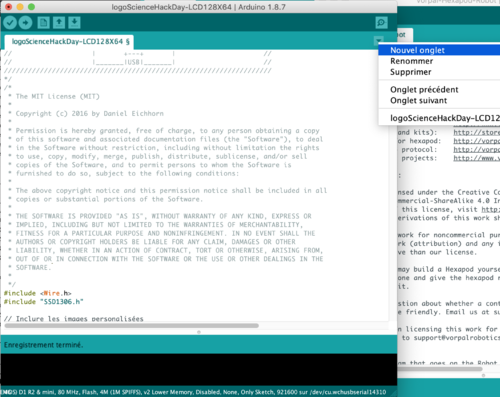
ouvrir une nouvelle fenetre de programme arduino. copiez-collez le programme principal cliquez à droite sur la flèche vers le bas et choisissez "nouvel onglet"
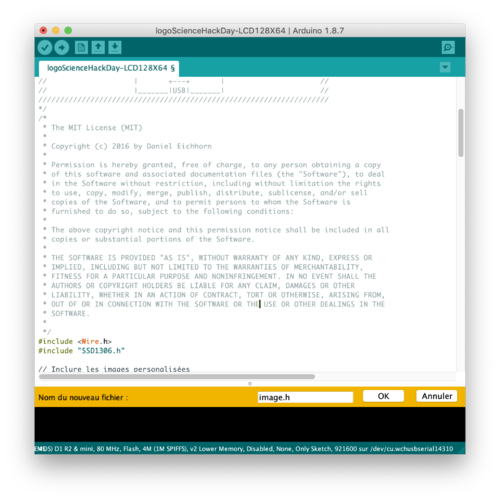
saisissez le nom "image.h"
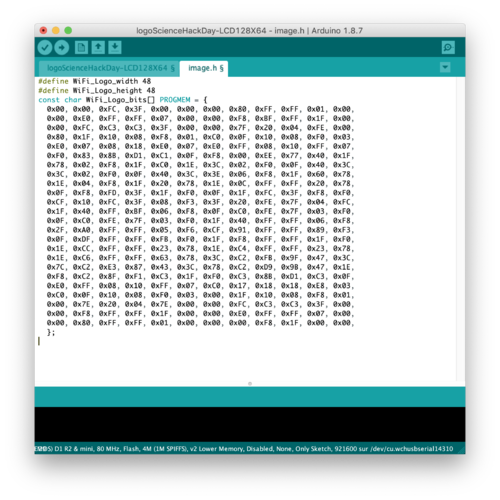
Copiez-collez le code plus bas ou le code correspondant à votre image
/////////////////////////////////
//                             //
//      Affichage du logo      //
//     du Science Hack Day     //
//   Sur un écran LCD 128X64   //
//                             //
/////////////////////////////////
/* Bon, le code est encore très "FRANKENCODE" - A vous d'adapter !
///////////////////////////////////////////////////////////////////
//                           BROCHAGE                            //
//                      _________________                        //
//                     /     D1 mini     \                       //
//                 -  |[ ]RST        TX[ ]| -                    //
//                 -  |[ ]A0         RX[ ]| -                    //
//                 -  |[ ]D0         D1[ ]| -                    //
//             SCL -  |[X]D5         D2[ ]| -                    //
//             SDA -  |[X]D6         D3[ ]| -                    //
//                 -  |[ ]D7         D4[ ]| LED_BUILTIN          //
//                 -  |[ ]D8        GND[X]| -                    //
//                 -  |[ ]3V3 .      5V[X]| -                    //
//                    |       +---+       |                      //
//                    |_______|USB|_______|                      //
///////////////////////////////////////////////////////////////////
*/
/*
 * The MIT License (MIT)
 *
 * Copyright (c) 2016 by Daniel Eichhorn
 *
 * Permission is hereby granted, free of charge, to any person obtaining a copy
 * of this software and associated documentation files (the "Software"), to deal
 * in the Software without restriction, including without limitation the rights
 * to use, copy, modify, merge, publish, distribute, sublicense, and/or sell
 * copies of the Software, and to permit persons to whom the Software is
 * furnished to do so, subject to the following conditions:
 *
 * The above copyright notice and this permission notice shall be included in all
 * copies or substantial portions of the Software.
 *
 * THE SOFTWARE IS PROVIDED "AS IS", WITHOUT WARRANTY OF ANY KIND, EXPRESS OR
 * IMPLIED, INCLUDING BUT NOT LIMITED TO THE WARRANTIES OF MERCHANTABILITY,
 * FITNESS FOR A PARTICULAR PURPOSE AND NONINFRINGEMENT. IN NO EVENT SHALL THE
 * AUTHORS OR COPYRIGHT HOLDERS BE LIABLE FOR ANY CLAIM, DAMAGES OR OTHER
 * LIABILITY, WHETHER IN AN ACTION OF CONTRACT, TORT OR OTHERWISE, ARISING FROM,
 * OUT OF OR IN CONNECTION WITH THE SOFTWARE OR THE USE OR OTHER DEALINGS IN THE
 * SOFTWARE.
 *
 */
#include <Wire.h>
#include "SSD1306.h"

// Inclure les images personalisées
#include "images.h"

// Initialisation de l'écran LCD en utilisant la bibliothèque Wire
SSD1306  display(0x3c, D6, D5);
// la comunication I2C à l'adresse 0x3c (pour l'écran OLED 128x64), broché en D6 pour SDA et D5 pour SCL


#define DEMO_DURATION 3000
typedef void (*Demo)(void);

int demoMode = 0;
int counter = 1;
int i =0;
int a = 0;

void setup() {
  Serial.begin(115200);
  Serial.println();
  Serial.println();


  // Initialising the UI will init the display too.
  display.init();

  display.flipScreenVertically();
  display.setFont(ArialMT_Plain_10);

}

void drawFontFaceDemo() {
    // Font Demo1
    // create more fonts at http://oleddisplay.squix.ch/
    display.setTextAlignment(TEXT_ALIGN_CENTER);
    display.setFont(ArialMT_Plain_10);
    display.drawString(0, 0, "SCIENCE HACK DAY");
}

void drawTextFlowDemo() {
    display.setFont(ArialMT_Plain_10);
    display.setTextAlignment(TEXT_ALIGN_LEFT);
    display.drawStringMaxWidth(0, 0, 128,
      "Lorem ipsum\n dolor sit amet, consetetur sadipscing elitr, sed diam nonumy eirmod tempor invidunt ut labore." );
}

void drawTextAlignmentDemo() {
    // Text alignment demo
  display.setFont(ArialMT_Plain_10);

  // The coordinates define the left starting point of the text
  display.setTextAlignment(TEXT_ALIGN_LEFT);
  display.drawString(0, 10, "Left aligned (0,10)");

  // The coordinates define the center of the text
  display.setTextAlignment(TEXT_ALIGN_CENTER);
  display.drawString(64, 22, "Center aligned (64,22)");

  // The coordinates define the right end of the text
  display.setTextAlignment(TEXT_ALIGN_RIGHT);
  display.drawString(128, 33, "Right aligned (128,33)");
}

void drawRectDemo() {
      // Draw a pixel at given position
    for (int i = 0; i < 10; i++) {
      display.setPixel(i, i);
      display.setPixel(10 - i, i);
    }
    display.drawRect(12, 12, 20, 20);

    // Fill the rectangle
    display.fillRect(14, 14, 17, 17);

    // Draw a line horizontally
    display.drawHorizontalLine(0, 40, 20);

    // Draw a line horizontally
    display.drawVerticalLine(40, 0, 20);
}

void drawCircleDemo() {
  for (int i=1; i < 8; i++) {
    display.setColor(WHITE);
    display.drawCircle(32, 32, i*3);
    if (i % 2 == 0) {
      display.setColor(BLACK);
    }
    display.fillCircle(96, 32, 32 - i* 3);
  }
}

void drawProgressBarDemo() {
  int progress = (counter / 5) % 100;
  // draw the progress bar
  display.drawProgressBar(0, 32, 120, 10, progress);

  // draw the percentage as String
  display.setTextAlignment(TEXT_ALIGN_CENTER);
  display.drawString(64, 15, String(progress) + "%");
}

void drawImageDemo() {
    // see http://blog.squix.org/2015/05/esp8266-nodemcu-how-to-create-xbm.html
    // on how to create xbm files
    display.drawXbm(i-50, 16, WiFi_Logo_width, WiFi_Logo_height, WiFi_Logo_bits);
    delay(50);
    i = i+1;
    a = a+2;
    if (i>178){
      i=0;
      }
      if (a>100){
        a = 0;
      }
}

Demo demos[] = {/*drawFontFaceDemo, drawTextFlowDemo, drawTextAlignmentDemo, drawRectDemo, drawCircleDemo, drawProgressBarDemo, */drawImageDemo};
int demoLength = (sizeof(demos) / sizeof(Demo));
long timeSinceLastModeSwitch = 0;

void loop() {
  // clear the display
  display.clear();
  // draw the current demo method
  demos[demoMode]();

  display.setTextAlignment(TEXT_ALIGN_RIGHT);
  display.drawString(10, 128, String(millis()));
  // write the buffer to the display
  display.display();

  if (millis() - timeSinceLastModeSwitch > DEMO_DURATION) {
    demoMode = (demoMode + 1)  % demoLength;
    timeSinceLastModeSwitch = millis();
  }
  counter++;
  delay(10);
}
Code à ajouter sous le nom de "image.h"
#define WiFi_Logo_width 48
#define WiFi_Logo_height 48
const char WiFi_Logo_bits[] PROGMEM = {
  0x00, 0x00, 0xFC, 0x3F, 0x00, 0x00, 0x00, 0x80, 0xFF, 0xFF, 0x01, 0x00,
  0x00, 0xE0, 0xFF, 0xFF, 0x07, 0x00, 0x00, 0xF8, 0xBF, 0xFF, 0x1F, 0x00,
  0x00, 0xFC, 0xC3, 0xC3, 0x3F, 0x00, 0x00, 0x7F, 0x20, 0x04, 0xFE, 0x00,
  0x80, 0x1F, 0x10, 0x08, 0xF8, 0x01, 0xC0, 0x0F, 0x10, 0x08, 0xF0, 0x03,
  0xE0, 0x07, 0x08, 0x18, 0xE0, 0x07, 0xE0, 0xFF, 0x08, 0x10, 0xFF, 0x07,
  0xF0, 0x83, 0x8B, 0xD1, 0xC1, 0x0F, 0xF8, 0x00, 0xEE, 0x77, 0x40, 0x1F,
  0x78, 0x02, 0xF8, 0x1F, 0xC0, 0x1E, 0x3C, 0x02, 0xF0, 0x0F, 0x40, 0x3C,
  0x3C, 0x02, 0xF0, 0x0F, 0x40, 0x3C, 0x3E, 0x06, 0xF8, 0x1F, 0x60, 0x78,
  0x1E, 0x04, 0xF8, 0x1F, 0x20, 0x78, 0x1E, 0x0C, 0xFF, 0xFF, 0x20, 0x78,
  0x0F, 0xF8, 0xFD, 0x3F, 0x1F, 0xF0, 0x0F, 0x1F, 0xFC, 0x3F, 0xF8, 0xF0,
  0xCF, 0x10, 0xFC, 0x3F, 0x08, 0xF3, 0x3F, 0x20, 0xFE, 0x7F, 0x04, 0xFC,
  0x1F, 0x40, 0xFF, 0xBF, 0x06, 0xF8, 0x0F, 0xC0, 0xFE, 0x7F, 0x03, 0xF0,
  0x0F, 0xC0, 0xFE, 0x7F, 0x03, 0xF0, 0x1F, 0x40, 0xFF, 0xFF, 0x06, 0xF8,
  0x2F, 0xA0, 0xFF, 0xFF, 0x05, 0xF6, 0xCF, 0x91, 0xFF, 0xFF, 0x89, 0xF3,
  0x0F, 0xDF, 0xFF, 0xFF, 0xFB, 0xF0, 0x1F, 0xF8, 0xFF, 0xFF, 0x1F, 0xF0,
  0x1E, 0xCC, 0xFF, 0xFF, 0x23, 0x78, 0x1E, 0xC4, 0xFF, 0xFF, 0x23, 0x78,
  0x1E, 0xC6, 0xFF, 0xFF, 0x63, 0x78, 0x3C, 0xC2, 0xFB, 0x9F, 0x47, 0x3C,
  0x7C, 0xC2, 0xE3, 0x87, 0x43, 0x3C, 0x78, 0xC2, 0xD9, 0x9B, 0x47, 0x1E,
  0xF8, 0xC2, 0x8F, 0xF1, 0xC3, 0x1F, 0xF0, 0xC3, 0x8B, 0xD1, 0xC3, 0x0F,
  0xE0, 0xFF, 0x08, 0x10, 0xFF, 0x07, 0xC0, 0x17, 0x18, 0x18, 0xE8, 0x03,
  0xC0, 0x0F, 0x10, 0x08, 0xF0, 0x03, 0x00, 0x1F, 0x10, 0x08, 0xF8, 0x01,
  0x00, 0x7E, 0x20, 0x04, 0x7E, 0x00, 0x00, 0xFC, 0xC3, 0xC3, 0x3F, 0x00,
  0x00, 0xF8, 0xFF, 0xFF, 0x1F, 0x00, 0x00, 0xE0, 0xFF, 0xFF, 0x07, 0x00,
  0x00, 0x80, 0xFF, 0xFF, 0x01, 0x00, 0x00, 0x00, 0xF8, 0x1F, 0x00, 0x00,
  };


