Light painting
Révision datée du 22 octobre 2019 à 12:43 par Antonydbzh (discussion | contributions) (→Réalisation)
présentation
Peindre avec la lumière ! Ici il s'agit d'utiliser des leds pilotées par un micro-controleur pour créer des images.
Réalisation
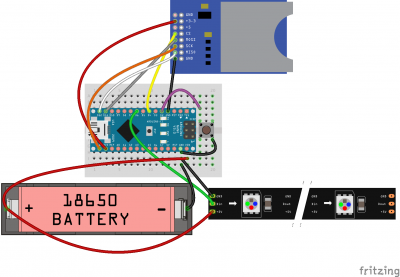
liste du matériel :
- Module de carte SD
- carte SD
- arduino
- ruban de 60 LEDs adressable : WDS2812B, néopixel
- un bouton poussoir
- un tasseau de 20mmX20mm
Voici l'image passée à la moulinette :

code :
////////////////////
//   PIXELSTICK   //
////////////////////

/*
 *
                                       +-----+
                            +----------| USB |----------+
                            |          +-----+          |
      SCK module carte SD - | [X]D13/SCK    MISO/D12[X] | - MISO du module carte
   VCC du module carte SD - | [X]3.3V       MOSI/D11[X]~| - MOSI du module carte SD
                            | [ ]V.ref    _   SS/D10[ ]~|
                            | [ ]A0     / N \     D9[ ]~|
                            | [ ]A1   /   A   \   D8[ ] |
                            | [ ]A2   \   N   /   D7[ ] |
                            | [ ]A3     \ 0 /     D6[X]~| - Ruban de led
                            | [ ]A4/SDA           D5[ ]~|
                            | [ ]A5/SCL           D4[X] | - broche CS du module carte SD
                            | [ ]A6          INT1/D3[ ]~|
                            | [ ]A7          INT0/D2[X] | - broche bouton
                            | [ ]5V              GND[ ] |
                            | [ ]RST             RST[ ] |
                            | [ ]GND 5V MOSI GND TX1[ ] |
                            | [ ]Vin [ ] [ ] [ ] RX1[ ] |
                            |        [ ] [ ] [ ]        |
                            |        MISO SCK RST       |
                            | NANO-V3                   |
                            |___________________________|

             ______________________________
            |        SD CARD  _____________|
           -|[ ]GND   MODULE |         /
 VCC       -|[ ]3,3V  [XXX]  |       / |
           -|[ ]5V      =    |     /   |
 broche 4  -|[ ]CS      =    |    |    |
 broche 11 -|[ ]MOSI    =    |    |    |
 broche 13 -|[ ]SCK .   =    |     \   |
 broche 12 -|[ ]MISO    =    |       \ |
 GND       -|[ ]GND     =    |_________\___
            |______________________________|


Matériel :
- Module de carte SD
- carte SD
- arduino
- ruban de 60 Leds adressables : WDS2812B, néopixel
- un bouton poussoir

Fortement inspiré de pixelstick par Lucas Berbesson for LA FABRIQUE DIY
LICENSE MIT
Voir https://github.com/LucasBerbesson/pixelstick

Schéma de l'Arduino en ASCII-ART CC-By http://busyducks.com/ascii-art-arduinos
Sous licence CC-By-Sa (http://creativecommons.org/licenses/by-nc-sa/3.0/)
*/
/*
   ___
 / ___ \
|_|   | |
     /_/
     _   ___   _
    |_| |___|_| |_
         ___|_   _|
        |___| |_|
Les petits Débrouillards - CC-By-Sa http://creativecommons.org/licenses/by-nc-sa/3.0/
*/
#include <SPI.h>
#include <SD.h>
#include <Adafruit_NeoPixel.h>
// Parameter 1 = number of pixels in strip
// Parameter 2 = pin number (most are valid)
// Parameter 3 = pixel type flags, add together as needed:
//   NEO_KHZ800  800 KHz bitstream (most NeoPixel products w/WS2812 LEDs)
//   NEO_KHZ400  400 KHz (classic 'v1' (not v2) FLORA pixels, WS2811 drivers)
//   NEO_GRB     Pixels are wired for GRB bitstream (most NeoPixel products)
//   NEO_RGB     Pixels are wired for RGB bitstream (v1 FLORA pixels, not v2)

// Broche "data" pour les données du ruban de Led
#define brocheLED 6
// Broche CS de la carte SD
#define brocheSD 4

int brocheBouton = 2;
//bool playAnimation = true;
int positionDuFichier = 0;
int nombreDeFichiers = 0;
bool Animation = true;
String nomDuFichier[10];
File root;
File dataFile;
String nomDuFichierCourant = "";

int nombreDeLED = 60;
Adafruit_NeoPixel strip = Adafruit_NeoPixel(nombreDeLED, brocheLED, NEO_GRB + NEO_KHZ800);

void setup() {
 Serial.begin(115200);
 pinMode(13, OUTPUT);
 pinMode(brocheBouton, INPUT_PULLUP);
 strip.begin();
 strip.show();
 setupSDcard();
 delay(100);
}

void loop() {
  if (digitalRead(brocheBouton) == LOW) {
     digitalWrite(13,HIGH);
     positionDuFichier++;
     Serial.println(positionDuFichier);
     delay(100);
     digitalWrite(13,LOW);
   }
  delay(500);
   Serial.print("envois du fichier");
   if ( positionDuFichier >= nombreDeFichiers) {
    positionDuFichier = 0;
   }
   SendFile(nomDuFichier[positionDuFichier]);
   ClearStrip();

}


void setupSDcard() {
 pinMode(brocheSD, OUTPUT);

 while (!SD.begin(brocheSD)) {
   Serial.println("échec de l'initialisation de carte SD ! ");
   delay(500);
 }
 Serial.println("la carte SD est initialisée ");
 delay(1000);
 root = SD.open("/");
 Serial.println("Exploration des fichiers ");
 delay(500);
 GetFileNamesFromSD(root);
}

// Cette fonction liste les fichiers de la carte SD
void GetFileNamesFromSD(File dir) {
 int fileCount = 0;
 String nomDuFichierCourant = "";
 while(1) {
   File entry =  dir.openNextFile();
   if (! entry) {
     // no more files / plus de fichier
     nombreDeFichiers = fileCount;
     Serial.println("nombre de fichiers ");
     Serial.println(fileCount);
   entry.close();
     break;
   }
   else {
       nomDuFichierCourant = entry.name();
       if (nomDuFichierCourant.endsWith(".TXT")) { //seulement les fichiers .txt
         if(nomDuFichierCourant.startsWith("_")){      // Si la carte SD est utilisée sur mac, le système ajoute des fichiers "sidecar".
          // Ils débutent par le caractère _, et ils ne doivent pas être pris en compe.
         }else{
           nomDuFichier[fileCount] = entry.name();
           fileCount++;
         }
       }
   }
   entry.close();
 }
}

// Cette fonction fait clignoter la première led et lance les animations.
void SendFile(String Filename) {
 char temp[14];
 Animation = true;
 Filename.toCharArray(temp,14);
 Serial.println(Filename);
 dataFile = SD.open(temp);
 // Si le fichier est accessible, l'envoyer au ruban de led
 if (dataFile) {
   int i = 0;
   int red, green, blue;
   strip.setPixelColor(1,255,255,255);
   strip.show();
   delay(500);
   strip.setPixelColor(1,0,0,0);
   strip.show();
   delay(500);
   strip.setPixelColor(1,255,255,255);
   strip.show();
   delay(500);
   strip.setPixelColor(1,0,0,0);
   strip.show();
   delay(2000);
   while(dataFile.available() && Animation){

     if (digitalRead(brocheBouton) == LOW) {
       Animation = false;
       break;
       delay(100);
     }
     if (i == (nombreDeLED)) {
       i=0;
       strip.show();
       delay(120);
       }
     red = dataFile.parseInt();
     green = dataFile.parseInt();
     blue = dataFile.parseInt();
     strip.setPixelColor(i, red, green, blue);
     i++;
   }
   Serial.print("Fermeture du fichier ");
   dataFile.close();
 } else {
   Serial.print("Erreur de lecture ");
   setupSDcard();
   return;
   }
 }

// Cette fonction éteint toute les leds du pixelstick
void ClearStrip() {
 int x;
 for(x=0;x<nombreDeLED;x++) {
   strip.setPixelColor(x, 0);
 }
 strip.show();
}
Traitement de l'image
Il faut d'abord créer une image qui fait le même nombre de pixel de large que le baton de pixel. Pour cela j'utilise GIMP (échelle et taille de l'image).
Ensuite il faut utiliser le script python de Lucas Berbesson (Voir https://github.com/LucasBerbesson/pixelstick) ou voir ici : Script Python "generate"
documentation
- Sur wikipédia : https://fr.wikipedia.org/wiki/Light_painting
- Pochoir de lightpainting à Brest : https://www.posethelight.com/quest-ce-que-le-pochoir-lumineux-en-light-painting/
- 35 photos d'artistes de lightpainting : http://www.marevueweb.com/photographies/light-painting/
- Voir également le projet HP19 : Roger, Gérard, Bernard réalisé dans le cadre du Hackathon pédagogique 2019 de la ville de Brest à l'IMT Atlantique.
- Le pixelstick sur github : https://github.com/LucasBerbesson/pixelstick
- Sur Instructable : https://www.instructables.com/id/Arduino-Pixel-Stick/
- site commercial pixelstick : http://thepixelstick.com/index.html
- Avec un raspberry pi chez Adafruit : https://learn.adafruit.com/dotstar-pi-painter
- Un autre : https://learn.adafruit.com/light-painting-with-raspberry-pi
- Avec un arduino chez Adafruit : https://learn.adafruit.com/neopixel-painter
- un autre : https://github.com/TheMasterFX/LED-Lightpainter/blob/master/platformio.ini
Pour de la vidéo :

