HP19 : Roger, Gérard, Bernard
Sommaire
Réalisation technique
un bâton pour faire du ligthpainting
L'idée est de découvrir une technique photographique : le lightpainting Nous allons fabriquer un "bâton" lumineux à l'aide d'un ruban led et d'un arduino. Nous utiliserons un smartphone en utilisant une application "light painting" permettant de faire des photographies en pause longue Nous débuterons par la création d'un arc en ciel
Diaporama
Fichier:Diaporama lightpainting2019.odp
Cadre pédagogique
Ce projet s'adresse à tous les publics. Il a pour objectif d'éduquer aux notions suivantes : comprendre une photo, découvrir une pratique artistique à partir d'un jeu de lumière Découverte de la LED RGB, utilisation d'un ruban LED, Découverte de l'arduino et du code (utilisation de l'IDE arduino). Une fois le sabre led réalisé, nous irons dans une salle sombre afin de faire des photos (avec un mode light painting). Ce projet a pour objectif de comprendre une image, découvrir une technique photographique en faisant soi-même des créations lumineuses.
Comment fabriquer notre prototype ?
Liste du matériel
Arduino micro et son câble de connexion Ruban led (RGB) des Câbles Fer à souder, étain, 3eme main et une lampe Condensateur 100µF Une breadboard (qui sera ensuite remplacée par une plaque de prototypage) Un PC pour écrire le code (PC avec l'IDE arduino installé) un baton une imprimante 3D pour imprimer une poignée (disponible sur thingiverse)
Comment le fabriquer
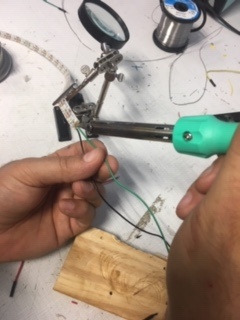
Dans un premier temps nous avons préparé le matériel. Nous avons soudé des câbles au ruban LED, et sur le support de batterie. Les extrémités des câbles ont été étamés (dépôt d'une pellicule fine d'étain)

Nous avons relié le circuit avec une breadbord.
le ruban LED est branché sur la broche 6 de l'arduino (PIN 6)
Nous avons creusé le morceau de bois pur y insérer le ruban led. Le ruban led a été fixé avec des colsons (dans un premier temps / prototype :-) )
voici le code utilisé :
- include <Adafruit_NeoPixel.h>
- ifdef __AVR__
#include <avr/power.h>
- endif
- define PIN 6
- define NUM_LEDS 40
- define BRIGHTNESS 50
Adafruit_NeoPixel strip = Adafruit_NeoPixel(NUM_LEDS, PIN, NEO_GRB + NEO_KHZ800);
byte neopix_gamma[] = {
   0,  0,  0,  0,  0,  0,  0,  0,  0,  0,  0,  0,  0,  0,  0,  0,
   0,  0,  0,  0,  0,  0,  0,  0,  0,  0,  0,  0,  1,  1,  1,  1,
   1,  1,  1,  1,  1,  1,  1,  1,  1,  2,  2,  2,  2,  2,  2,  2,
   2,  3,  3,  3,  3,  3,  3,  3,  4,  4,  4,  4,  4,  5,  5,  5,
   5,  6,  6,  6,  6,  7,  7,  7,  7,  8,  8,  8,  9,  9,  9, 10,
  10, 10, 11, 11, 11, 12, 12, 13, 13, 13, 14, 14, 15, 15, 16, 16,
  17, 17, 18, 18, 19, 19, 20, 20, 21, 21, 22, 22, 23, 24, 24, 25,
  25, 26, 27, 27, 28, 29, 29, 30, 31, 32, 32, 33, 34, 35, 35, 36,
  37, 38, 39, 39, 40, 41, 42, 43, 44, 45, 46, 47, 48, 49, 50, 50,
  51, 52, 54, 55, 56, 57, 58, 59, 60, 61, 62, 63, 64, 66, 67, 68,
  69, 70, 72, 73, 74, 75, 77, 78, 79, 81, 82, 83, 85, 86, 87, 89,
  90, 92, 93, 95, 96, 98, 99,101,102,104,105,107,109,110,112,114,
 115,117,119,120,122,124,126,127,129,131,133,135,137,138,140,142,
 144,146,148,150,152,154,156,158,160,162,164,167,169,171,173,175,
 177,180,182,184,186,189,191,193,196,198,200,203,205,208,210,213,
 215,218,220,223,225,228,231,233,236,239,241,244,247,249,252,255 };
void setup() {
 // This is for Trinket 5V 16MHz, you can remove these three lines if you are not using a Trinket
 #if defined (__AVR_ATtiny85__)
   if (F_CPU == 16000000) clock_prescale_set(clock_div_1);
 #endif
 // End of trinket special code
 strip.setBrightness(BRIGHTNESS);
 strip.begin();
 strip.show(); // Initialize all pixels to 'off'
}
void loop() {
 // Some example procedures showing how to display to the pixels:
 colorWipe(strip.Color(255, 0, 0), 50); // Red
 colorWipe(strip.Color(0, 255, 0), 50); // Green
 colorWipe(strip.Color(0, 0, 255), 50); // Blue
 colorWipe(strip.Color(255, 255, 255), 50); // White
whiteOverRainbow(20,75,5);
pulseWhite(5);
 // fullWhite();
 // delay(2000);
rainbowFade2White(3,3,1);
}
// Fill the dots one after the other with a color void colorWipe(uint32_t c, uint8_t wait) {
 for(uint16_t i=0; i<strip.numPixels(); i++) {
   strip.setPixelColor(i, c);
   strip.show();
   delay(wait);
 }
}
void pulseWhite(uint8_t wait) {
 for(int j = 0; j < 256 ; j++){
     for(uint16_t i=0; i<strip.numPixels(); i++) {
         strip.setPixelColor(i, strip.Color(0,0,0, neopix_gamma[j] ) );
       }
       delay(wait);
       strip.show();
     }
 for(int j = 255; j >= 0 ; j--){
     for(uint16_t i=0; i<strip.numPixels(); i++) {
         strip.setPixelColor(i, strip.Color(0,0,0, neopix_gamma[j] ) );
       }
       delay(wait);
       strip.show();
     }
}
void rainbowFade2White(uint8_t wait, int rainbowLoops, int whiteLoops) {
 float fadeMax = 100.0;
 int fadeVal = 0;
 uint32_t wheelVal;
 int redVal, greenVal, blueVal;
 for(int k = 0 ; k < rainbowLoops ; k ++){

   for(int j=0; j<256; j++) { // 5 cycles of all colors on wheel
for(int i=0; i< strip.numPixels(); i++) {
wheelVal = Wheel(((i * 256 / strip.numPixels()) + j) & 255);
       redVal = red(wheelVal) * float(fadeVal/fadeMax);
       greenVal = green(wheelVal) * float(fadeVal/fadeMax);
       blueVal = blue(wheelVal) * float(fadeVal/fadeMax);
strip.setPixelColor( i, strip.Color( redVal, greenVal, blueVal ) );
}
     //First loop, fade in!
     if(k == 0 && fadeVal < fadeMax-1) {
         fadeVal++;
     }
     //Last loop, fade out!
     else if(k == rainbowLoops - 1 && j > 255 - fadeMax ){
         fadeVal--;
     }
       strip.show();
       delay(wait);
   }

 }
delay(500);
for(int k = 0 ; k < whiteLoops ; k ++){
for(int j = 0; j < 256 ; j++){
       for(uint16_t i=0; i < strip.numPixels(); i++) {
           strip.setPixelColor(i, strip.Color(0,0,0, neopix_gamma[j] ) );
         }
         strip.show();
       }
       delay(2000);
   for(int j = 255; j >= 0 ; j--){
       for(uint16_t i=0; i < strip.numPixels(); i++) {
           strip.setPixelColor(i, strip.Color(0,0,0, neopix_gamma[j] ) );
         }
         strip.show();
       }
 }
delay(500);
}
void whiteOverRainbow(uint8_t wait, uint8_t whiteSpeed, uint8_t whiteLength ) {
if(whiteLength >= strip.numPixels()) whiteLength = strip.numPixels() - 1;
 int head = whiteLength - 1;
 int tail = 0;
 int loops = 3;
 int loopNum = 0;
static unsigned long lastTime = 0;
 while(true){
   for(int j=0; j<256; j++) {
     for(uint16_t i=0; i<strip.numPixels(); i++) {
       if((i >= tail && i <= head) || (tail > head && i >= tail) || (tail > head && i <= head) ){
         strip.setPixelColor(i, strip.Color(255,255,255 ) );
       }
       else{
         strip.setPixelColor(i, Wheel(((i * 256 / strip.numPixels()) + j) & 255));
       }

     }
     if(millis() - lastTime > whiteSpeed) {
       head++;
       tail++;
       if(head == strip.numPixels()){
         loopNum++;
       }
       lastTime = millis();
     }
     if(loopNum == loops) return;

     head%=strip.numPixels();
     tail%=strip.numPixels();
       strip.show();
       delay(wait);
   }
 }
} void fullWhite() {
   for(uint16_t i=0; i<strip.numPixels(); i++) {
       strip.setPixelColor(i, strip.Color(0,0,0, 255 ) );
   }
     strip.show();
}
// Slightly different, this makes the rainbow equally distributed throughout
void rainbowCycle(uint8_t wait) {
uint16_t i, j;
 for(j=0; j<256 * 5; j++) { // 5 cycles of all colors on wheel
   for(i=0; i< strip.numPixels(); i++) {
     strip.setPixelColor(i, Wheel(((i * 256 / strip.numPixels()) + j) & 255));
   }
   strip.show();
   delay(wait);
 }
}
void rainbow(uint8_t wait) {
uint16_t i, j;
 for(j=0; j<256; j++) {
   for(i=0; i<strip.numPixels(); i++) {
     strip.setPixelColor(i, Wheel((i+j) & 255));
   }
   strip.show();
   delay(wait);
 }
}
// Input a value 0 to 255 to get a color value. // The colours are a transition r - g - b - back to r. uint32_t Wheel(byte WheelPos) {
 WheelPos = 255 - WheelPos;
 if(WheelPos < 85) {
   return strip.Color(255 - WheelPos * 3, 0, WheelPos * 3,0);
 }
 if(WheelPos < 170) {
   WheelPos -= 85;
   return strip.Color(0, WheelPos * 3, 255 - WheelPos * 3,0);
 }
 WheelPos -= 170;
 return strip.Color(WheelPos * 3, 255 - WheelPos * 3, 0,0);
}
uint8_t red(uint32_t c) {
return (c >> 16);
} uint8_t green(uint32_t c) {
return (c >> 8);
} uint8_t blue(uint32_t c) {
return (c);
}
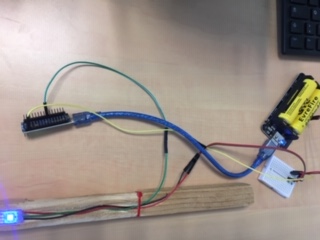
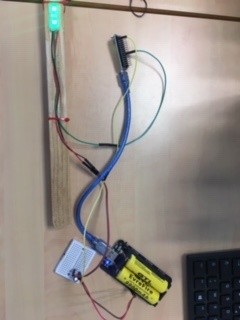
- voici une photo du montage :
Conseils etc...
- Faire attention à la polarité du condensateur (le pôle - a une bande blanche sur le coté)
- le ruban led a un sens (le sens est indiqué par des petites flèches imprimées sur le ruban)
- télécharger la bibliothèque Adafruit : <Adafruit_NeoPixel.h>
- ouvrir l'exemple dans l'IDE arduino (copie du code ci-dessus / avec les modifications en lien avec notre montage)
- pour la poignée, nous avons fait un dessin sur le logiciel Thinkercad:
voici le plan : https://www.tinkercad.com/things/aHpPU93ZTAd
Liens vers des ressources
- des sites web documentaires
bibliothèque adafruit disponible sur GITHUB : https://github.com/adafruit/Adafruit_NeoPixel
- sites ressources


