HL 21 Le cube : Différence entre versions
| (49 révisions intermédiaires par 2 utilisateurs non affichées) | |||
| Ligne 3 : | Ligne 3 : | ||
==Le Cube== | ==Le Cube== | ||
| + | <br> | ||
| + | '''Sources d’inspiration :''' | ||
| − | + | https://www.instructables.com/Concrete-LED-Light-Cube/ | |
| − | |||
https://www.instructables.com/LED-Cube-Light/ | https://www.instructables.com/LED-Cube-Light/ | ||
| + | |||
https://www.instructables.com/Awesome-led-cube/ | https://www.instructables.com/Awesome-led-cube/ | ||
| + | https://www.teachmemicro.com/1-3-i2c-oled-arduino-esp8266-tutorial/ | ||
| + | <br> | ||
| + | ==membres du projet== | ||
| + | '''Participants''' : Yann, Patrick, Pierre, Olivier | ||
| − | + | <br> | |
| + | '''Experte conseil''' : Lisa et Pierre pour la bonne bibliothèque pour l'Oled | ||
| + | <br> | ||
| + | ==prototype qu'on souhaite réaliser == | ||
Sur un idée de Yann, nous partons sur l’idée d’un cube qui va aider les enfants à prendre connaissance du rythme de la journée tel qu’il est fixé par les adultes. | Sur un idée de Yann, nous partons sur l’idée d’un cube qui va aider les enfants à prendre connaissance du rythme de la journée tel qu’il est fixé par les adultes. | ||
| + | |||
L’idée est de fournir des repères aux enfants en toute autonomie. | L’idée est de fournir des repères aux enfants en toute autonomie. | ||
| + | |||
En fonction des temps de la journée le cube éclairera d’une certaine couleur. | En fonction des temps de la journée le cube éclairera d’une certaine couleur. | ||
Les temps de la journée sont : | Les temps de la journée sont : | ||
| − | • Accueil arrivée | + | • 7h30 : Accueil arrivée / jaune |
| − | • Rangement | + | • 9h30 : Rangement rassemblement / blanc |
| − | • Activité | + | • 9h45 : Activité / Rouge |
| − | • Rangement rassemblement | + | • 11h30 : Rangement rassemblement / blanc |
| − | • Repas | + | • 11h45 : Repas / vert |
| − | • Temps sieste | + | • 13h00 : Rangement rassemblement / blanc |
| − | • | + | • 13h20 : Temps sieste / bleu |
| − | • Goûter | + | • 15h30 : Lever sieste / cyan |
| − | • Accueil départ | + | • 15h45 : Rassemblement / blanc |
| + | • 16h00 : Goûter / vert | ||
| + | • 16h30 : Activité temps libre / Rouge | ||
| + | • 17h00 : Accueil départ / orange | ||
| − | Liste | + | ==Liste du matériel== |
* feuille de calque | * feuille de calque | ||
| − | * led | + | * led blanche diamètre 10mm |
* interrupteur | * interrupteur | ||
| − | * wemos | + | * wemos D1 mini https://www.wemos.cc/en/latest/d1/d1_mini.html |
| − | * led rgb | + | * ruban led rgb WS2812 |
* batterie 18650 | * batterie 18650 | ||
* shield batterie | * shield batterie | ||
* clock shield | * clock shield | ||
| − | * ecran | + | * ecran oled 1.3" |
* bois picto | * bois picto | ||
| − | + | ==Réalisation== | |
| − | |||
| − | |||
| − | |||
| − | |||
| − | |||
| − | |||
| − | |||
| − | |||
| − | |||
| − | |||
| − | |||
| − | |||
| − | |||
| − | |||
| − | |||
| − | |||
| − | |||
| − | |||
| − | |||
| − | |||
| − | |||
| − | |||
| − | |||
| − | |||
| − | |||
| − | |||
| − | |||
| − | |||
| − | |||
| − | |||
| − | |||
| − | |||
| − | |||
| − | |||
| − | |||
| − | |||
| − | |||
| − | |||
| − | |||
| − | |||
| − | |||
| − | |||
| − | |||
| − | |||
| − | |||
| − | |||
| − | |||
| − | |||
| − | |||
| − | |||
| − | |||
| − | |||
| − | |||
| − | |||
| − | |||
| − | |||
| − | |||
| − | |||
| − | |||
| − | |||
| − | |||
| − | |||
| − | |||
| − | |||
| − | |||
| − | |||
| − | |||
| − | |||
| − | |||
| − | |||
| − | |||
| − | |||
| − | |||
| − | |||
| − | |||
| − | |||
| − | |||
| − | |||
| − | |||
| − | |||
| − | |||
| − | |||
| − | |||
| − | |||
| − | |||
| − | |||
| − | |||
| − | |||
| − | |||
| − | |||
| − | |||
| − | |||
| − | |||
| − | |||
| − | |||
| − | |||
| − | |||
| − | |||
| − | |||
| − | |||
| − | |||
| − | |||
| − | |||
| − | |||
| − | |||
| − | |||
| − | |||
| − | |||
| − | |||
| − | |||
| − | |||
| − | |||
| − | |||
| − | |||
| − | |||
| − | |||
| − | |||
| − | |||
| − | |||
| − | |||
| − | |||
| − | |||
| − | |||
| − | |||
| − | |||
| − | |||
| − | |||
| − | |||
| − | |||
| − | |||
| − | |||
| − | |||
| − | |||
| − | |||
| − | |||
| − | |||
| − | |||
| − | |||
| − | |||
| − | |||
| − | |||
| − | |||
| − | |||
| − | |||
| − | |||
| − | |||
| − | |||
| − | |||
| − | |||
| − | |||
| − | |||
| − | |||
| − | |||
| − | |||
| − | |||
| − | |||
| − | |||
| − | |||
| − | |||
| − | |||
| − | |||
| − | |||
| − | |||
| − | |||
| − | |||
| − | |||
| − | |||
| − | |||
| − | |||
| − | |||
| − | |||
| − | |||
| − | |||
| − | |||
| − | |||
| − | |||
| − | |||
| − | |||
| − | |||
| − | |||
| − | |||
| − | |||
| − | |||
| − | |||
| − | |||
| − | |||
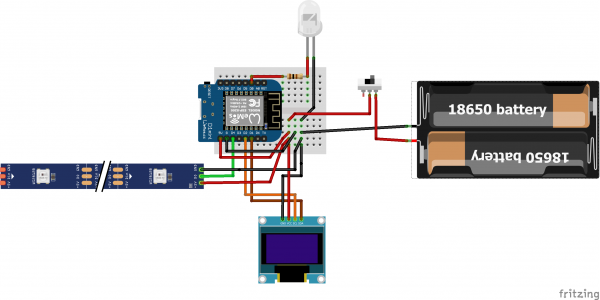
| − | + | [[image:LeCube bb.png|600px]] | |
| − | + | Le schéma électrique du Cube | |
| − | |||
| − | |||
| − | |||
| − | |||
| − | |||
| − | |||
| − | |||
| − | |||
| − | |||
| − | + | [[image:PiloterLeCube.png|300px]] | |
| + | L'interface web permet de gérer la luminosité du cube | ||
| − | |||
| − | |||
| − | |||
| − | |||
| − | |||
| − | |||
| − | |||
| − | |||
| − | |||
| − | |||
| − | |||
| − | + | Le code de l'application : [[Fichier:LeCube.zip]] | |
| − | + | Le cube est découpé et dépoli au laser (après un test sur du carton). | |
| − | |||
| − | |||
| − | |||
| − | |||
| − | |||
| − | |||
| − | |||
| − | |||
| − | |||
| − | |||
| − | // | + | https://www.wiki.lesfabriquesduponant.net/images/c/c2/Decoupe%22_plexi_130x130x130.pdf |
| − | + | https://www.wiki.lesfabriquesduponant.net/images/c/c4/Decoupe_embase_MDF135x135x60_3mm.pdf | |
| − | |||
| − | |||
| − | |||
| − | |||
| − | |||
| − | |||
| − | |||
| − | |||
| − | |||
| − | |||
| − | + | La base est modélisée sous inkscape testée sur carton puis découpée sur du mdf. | |
| − | + | Ce qu'il nous/vous reste à faire : | |
| − | + | Interface web à améliorer | |
| − | |||
| − | |||
| − | |||
| − | |||
| − | |||
| − | |||
| − | |||
| − | |||
| − | |||
| − | |||
| − | |||
| − | == | + | ==Les images == |
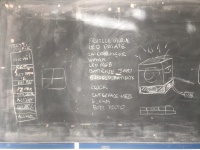
[[Fichier:HL 21 Le cube.JPG|200px|thumb|left|tableau lowtech]] | [[Fichier:HL 21 Le cube.JPG|200px|thumb|left|tableau lowtech]] | ||
[[Fichier:Activite.png|200px|thumb|left|icon activité]] | [[Fichier:Activite.png|200px|thumb|left|icon activité]] | ||
| Ligne 310 : | Ligne 88 : | ||
[[Fichier:Trio.jpg|200px|thumb|left|icon arrivee]icon rangement/rassemblement]] | [[Fichier:Trio.jpg|200px|thumb|left|icon arrivee]icon rangement/rassemblement]] | ||
[[Fichier:Sieste.jpg|200px|thumb|left|icon sieste]] | [[Fichier:Sieste.jpg|200px|thumb|left|icon sieste]] | ||
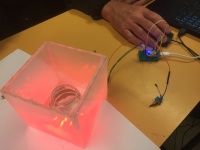
| + | [[Fichier:CubeLed.JPG|200px|thumb|left|CubeLed]] | ||
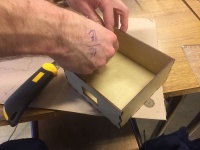
| + | [[Fichier:Basecube.JPG|200px|thumb|left|Basecube]] | ||
| + | [[Fichier:LeCubeInterne.jpg|200px|thumb|left|Intérieur du Cube]] | ||
| + | [[Fichier:LeCubeExterne.jpg|200px|thumb|left|Extérieur du Cube]] | ||
[[Catégorie:HP21 Lumière]] | [[Catégorie:HP21 Lumière]] | ||
[[Catégorie:Hackathon Pédagogique]] | [[Catégorie:Hackathon Pédagogique]] | ||
| + | [[Catégorie:led]][[Catégorie:ruban de led]][[Catégorie:WS1812B]] | ||
Version actuelle datée du 3 décembre 2023 à 11:16
Sommaire
HP 21 lumière : Le cube
Le Cube
Sources d’inspiration :
https://www.instructables.com/Concrete-LED-Light-Cube/
https://www.instructables.com/LED-Cube-Light/
https://www.instructables.com/Awesome-led-cube/
https://www.teachmemicro.com/1-3-i2c-oled-arduino-esp8266-tutorial/
membres du projet
Participants : Yann, Patrick, Pierre, Olivier
Experte conseil : Lisa et Pierre pour la bonne bibliothèque pour l'Oled
prototype qu'on souhaite réaliser
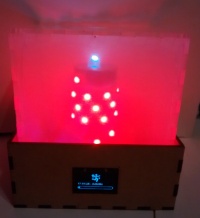
Sur un idée de Yann, nous partons sur l’idée d’un cube qui va aider les enfants à prendre connaissance du rythme de la journée tel qu’il est fixé par les adultes.
L’idée est de fournir des repères aux enfants en toute autonomie.
En fonction des temps de la journée le cube éclairera d’une certaine couleur.
Les temps de la journée sont :
   • 7h30 : Accueil arrivée / jaune
   • 9h30 : Rangement rassemblement / blanc
   • 9h45 : Activité / Rouge
   • 11h30 : Rangement rassemblement / blanc
   • 11h45 : Repas / vert
   • 13h00 : Rangement rassemblement / blanc
   • 13h20 : Temps sieste / bleu
   • 15h30 : Lever sieste / cyan
   • 15h45 : Rassemblement / blanc
   • 16h00 : Goûter / vert
   • 16h30 : Activité temps libre / Rouge
   • 17h00 : Accueil départ / orange
Liste du matériel
- feuille de calque
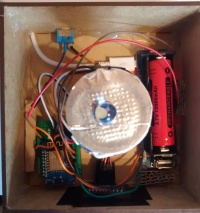
- led blanche diamètre 10mm
- interrupteur
- wemos D1 mini https://www.wemos.cc/en/latest/d1/d1_mini.html
- ruban led rgb WS2812
- batterie 18650
- shield batterie
- clock shield
- ecran oled 1.3"
- bois picto
Réalisation
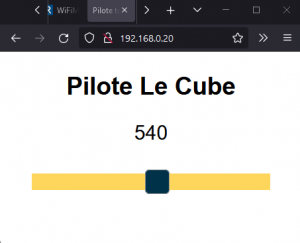 L'interface web permet de gérer la luminosité du cube
Le code de l'application : Fichier:LeCube.zip
Le cube est découpé et dépoli au laser (après un test sur du carton).
https://www.wiki.lesfabriquesduponant.net/images/c/c2/Decoupe%22_plexi_130x130x130.pdf
https://www.wiki.lesfabriquesduponant.net/images/c/c4/Decoupe_embase_MDF135x135x60_3mm.pdf
La base est modélisée sous inkscape testée sur carton puis découpée sur du mdf.
Ce qu'il nous/vous reste à faire : Interface web à améliorer

