ENIB 2024 : CatchTheJackpot : Différence entre versions
(→Code :) |
(→Code :) |
||
| (8 révisions intermédiaires par 2 utilisateurs non affichées) | |||
| Ligne 26 : | Ligne 26 : | ||
* Breadboard | * Breadboard | ||
* 2 résistances de 500kΩ | * 2 résistances de 500kΩ | ||
| + | * Buzzer | ||
==Outils== | ==Outils== | ||
| Ligne 39 : | Ligne 40 : | ||
https://fastled.io/ | https://fastled.io/ | ||
| − | == | + | ==Code :== |
| − | |||
| − | = | + | <syntaxhighlight lang="Arduino" line> |
//Programme fait sur carte STM8266 / WEMOS D1 mini | //Programme fait sur carte STM8266 / WEMOS D1 mini | ||
| Ligne 382 : | Ligne 382 : | ||
} | } | ||
} | } | ||
| + | </syntaxhighlight> | ||
==étapes de fabrication== | ==étapes de fabrication== | ||
| Ligne 387 : | Ligne 388 : | ||
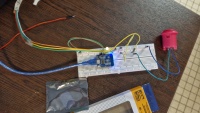
===étape 1: câbler et souder=== | ===étape 1: câbler et souder=== | ||
| − | câbler les fils entre | + | câbler les fils entre différents composants (selon le schéma) puis souder les fils si nécessaire et enfin téléverser le programme dans la carte si nécessaire. |
[[Fichier:Cablage.jpg|200px]] | [[Fichier:Cablage.jpg|200px]] | ||
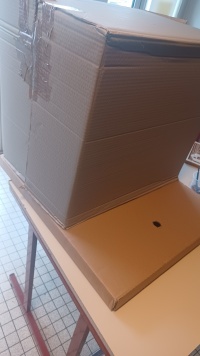
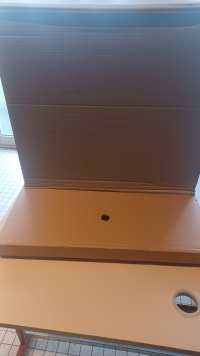
===étape 2: le support=== | ===étape 2: le support=== | ||
| − | réaliser le | + | réaliser le prototype en carton |
| Ligne 398 : | Ligne 399 : | ||
[[Fichier:Tonk2.jpg|200px]] | [[Fichier:Tonk2.jpg|200px]] | ||
| − | ===étape ... | + | ===étape 3 : support en bois=== |
| + | |||
| + | On réalise en suite le support en bois. | ||
| + | |||
| + | Grâce au prototype en carton on dessine le support en bois puis on reporte les mesures sur des plaques en bois pour ensuite les découper. | ||
| + | |||
| + | Une fois les différentes parties du support faites on les assemble. | ||
| + | |||
===troubleshouting=== | ===troubleshouting=== | ||
quelles sont difficultés, les problèmes, quelles sont les solutions, les trucs et astuces pour que ça marche ? | quelles sont difficultés, les problèmes, quelles sont les solutions, les trucs et astuces pour que ça marche ? | ||
1er problème : le programme ne marchait pas car la LED était montée à l'envers | 1er problème : le programme ne marchait pas car la LED était montée à l'envers | ||
| + | |||
| + | On a mit la led ans le bon sens puis on a adapté le programme. | ||
2ème problème : adapter la taille du support qui était d'abord trop grand | 2ème problème : adapter la taille du support qui était d'abord trop grand | ||
| + | |||
| + | On a utilisé le support en carton pour créer un support en bois plus petit. | ||
==Sources et documentation complémentaire== | ==Sources et documentation complémentaire== | ||
| Ligne 410 : | Ligne 422 : | ||
==ne pas modifier sous cette ligne== | ==ne pas modifier sous cette ligne== | ||
[[Catégorie:Enib2024]] | [[Catégorie:Enib2024]] | ||
| + | [[Catégorie:N]] | ||
Version actuelle datée du 6 mars 2024 à 15:13
Sommaire
description
Ce projet fonction grâce à une carte Arduino, des LEDs et un bouton.
Une lumière traverse le ruban de gauche à droite et lorsqu'elle est au milieu, il faut appuyer sur le bouton au bon moment pour gagner.
réalisé par :
-Arnaud Genty
-Maxime Bintein
-Tristan Le Coz
Introduction
éventuelle vidéo
Liste des composants
- Bouton poussoir style Arcade
- Arduino nano
- 2 rubans de LED adressable (85 LEDs pour être exacte)
- Carton
- Bois
- Câbles mini-USB
- Câbles
- écran LCD
- Breadboard
- 2 résistances de 500kΩ
- Buzzer
Outils
- Cutter
- Marqueur noir
- Pistolet à colle
- Scotch
- Fer à souder
- Scie à bois
- Perceuse
- Bibliothèque Arduino FastLed
https://fastled.io/
Code :
  1
  2
  3 //Programme fait sur carte STM8266 / WEMOS D1 mini
  4 #include "pitches.h"
  5 #include "FastLED.h"                    //bibliothèque pour controler le ruban led
  6 #include <Wire.h>                  //bibliothèque écran
  7 #include <LiquidCrystal_I2C.h>     //bibliothèque écran
  8 #define REST 0
  9 #define NUM_LEDS 86
 10 #define NUM_OF_LEDS_BY_LEVEL 17         // nombre de leds par niveau
 11 #define NUM_OF_LEVELS 5                  // nombre de niveaux
 12 #define PIN_BTN D3                       // Entree du bouton
 13 #define PIN_LEDS D4                      // Sortie du ruban led
 14 #define PIN_BUZZER D8                    // Signal de sortie buzzer
 15
 16
 17 // -------- INIT VARIABLES --------
 18 LiquidCrystal_I2C lcd(0x27, 16, 2);
 19 CRGB leds[NUM_LEDS]; //Création d'une liste avec chaque led
 20 CRGB randomcolor  = CHSV(random(192), 255, 255);
 21 int level = 0;        // niveau auquel le joueur est
 22 int delay_level = 30; // délai qui permet de controler la vitesse de déplacement de la led
 23 auto color = CRGB::Blue; // couleur de la led qui se déplace
 24 int score = 0;           // score du joueur
 25 const double coef[] = {1,1.5,2,2.5,3}; // coefficient multiplicateur de point par niveau
 26 int last_point[NUM_OF_LEVELS];     // sauvegarde de la derniere led allumée pour la rallumer après flash()
 27 bool game_in_progress = false;
 28 int last_point_visu = 0;
 29
 30
 31
 32 // -------- INIT FONCTIONS --------
 33
 34 int move();            // déplacement de la led
 35 void level_up();    // passage de niveau
 36 void waiting_start_game(); //affichage d'attente de début du jeu
 37 void flash();       // animation de victoire d'un niveau
 38
 39 // -------- PROGRAMME --------
 40 void setup() {
 41   FastLED.addLeds<NEOPIXEL, D4>(leds, NUM_LEDS);     // setup du ruban de led sur la sortie PIN_LEDS => 2
 42   pinMode(PIN_BTN, INPUT);                          // setup du bouton dur l'entrée PIN_BTN => 3
 43   FastLED.setBrightness(50);                    // setup de la luminosité
 44   Serial.begin(9600);                               // setup moniteur série pour debug
 45   int last_point[NUM_OF_LEVELS];
 46   pinMode(PIN_BUZZER, OUTPUT);
 47
 48   // -------- ECRAN --------
 49   lcd.init();                        // Initialize I2C LCD module
 50   lcd.backlight();                   // Turn backlight ON
 51 }
 52
 53
 54 void loop() {
 55   waiting_start_game();
 56     lcd.setCursor(0,0);
 57     lcd.print("    Cliquer ");
 58     lcd.setCursor(0,1);
 59     lcd.print(" pour commencer");
 60     FastLED.clear();
 61   if (digitalRead(PIN_BTN)==LOW){
 62     musique();
 63     game_in_progress = true;
 64     lcd.clear();
 65     lcd.setCursor(0,0);
 66     lcd.print("Partie en cours !");
 67     lcd.setCursor(0,1);
 68     lcd.print("XoXoXoXoXoXoXoXo");
 69     FastLED.clear();
 70     delay(400);
 71     while(game_in_progress){
 72       move();
 73       if (digitalRead(PIN_BTN)==LOW && game_in_progress==true){
 74         level_up();
 75       }
 76     }
 77   }
 78 }
 79
 80
 81 int move(){
 82   // Permet de faire bouger la LED de gauche à droite
 83   for (int i = NUM_OF_LEDS_BY_LEVEL * level; i <= (NUM_OF_LEDS_BY_LEVEL * level + NUM_OF_LEDS_BY_LEVEL - 1); i++){
 84     // -------- DEBUGGING -------- //
 85     /*
 86     Serial.print("val de la led: ");
 87     Serial.print(i);
 88     Serial.print("\n");
 89     */
 90     if (digitalRead(PIN_BTN)==LOW){     //Stock des scores LEDs 1 -> 9 -> 1
 91       int center = abs(i - (NUM_OF_LEDS_BY_LEVEL * level + NUM_OF_LEDS_BY_LEVEL / 2));
 92       if (center <= NUM_OF_LEDS_BY_LEVEL/2) {
 93         last_point[level] = NUM_OF_LEDS_BY_LEVEL/2 - center + 1;  // Les points augmentent jusqu'à 9
 94       } else {
 95         last_point[level] = 0;  // À partir de la position 9, les points diminuent
 96       }
 97     //   if(i<(1/2*NUM_OF_LEDS_BY_LEVEL)){
 98     //     last_point[level] = i;
 99     //   }
100     //   else{
101     //     for(int degr = 1; degr<NUM_OF_LEDS_BY_LEVEL; degr++)
102     //     last_point[level] = (i - degr);
103
104     // }
105       int last_point_visu = i-1;
106       return i-1;
107       // -------- DEBUGGING -------- //
108       /*
109       Serial.print("last_point_visu");
110       Serial.print(last_point_visu);
111
112       for(int z=0; z<NUM_OF_LEVELS; z++){
113         Serial.print(last_point[z]);
114         Serial.print("\n");
115       }
116       */
117
118
119     }
120     //Eteins les LEDs derrière la LED mouvante
121     leds[i - 1] = CRGB::Black;
122     delay(3);
123     leds[level * NUM_OF_LEDS_BY_LEVEL + NUM_OF_LEDS_BY_LEVEL / 2] = CRGB::Yellow;
124     leds[i] = color;
125     FastLED.show();
126     delay(delay_level);
127   }
128   leds[NUM_OF_LEDS_BY_LEVEL * level + 20] = CRGB::Black;
129   FastLED.show();
130   delay(delay_level);
131   for (int i = NUM_OF_LEDS_BY_LEVEL * level +  NUM_OF_LEDS_BY_LEVEL - 1; i >= NUM_OF_LEDS_BY_LEVEL * level ; i--)
132   {
133     // -------- DEBUGGING -------- //
134     /*
135     Serial.print("val de la led: ");
136     Serial.print(i);
137     Serial.print("\n");
138     */
139     if (digitalRead(PIN_BTN)==LOW){           //Stock des scores LEDs 1 -> 9 -> 1
140       int center = abs(i - (NUM_OF_LEDS_BY_LEVEL * level + NUM_OF_LEDS_BY_LEVEL / 2));
141       if (center <= NUM_OF_LEDS_BY_LEVEL/2) {
142         last_point[level] = NUM_OF_LEDS_BY_LEVEL/2 - center + 1;  // Les points augmentent jusqu'à 9
143       } else {
144         last_point[level] = 0;  // À partir de la position 9, les points diminuent
145       }
146       // if(i<(1/2*NUM_OF_LEDS_BY_LEVEL)){
147       //   last_point[level] = i;
148       // }
149       // else{
150       //   for(int degr = 1; degr<NUM_OF_LEDS_BY_LEVEL; degr++)
151       //   last_point[level] = (i - degr);
152       //   }
153
154       int last_point_visu = i+1;
155       return i+1;
156
157       // -------- DEBUGGING -------- //
158       /*
159       Serial.print("last_point_visu");
160       Serial.print(last_point_visu);
161
162       for(int z=0; z<NUM_OF_LEVELS; z++){
163         Serial.print(last_point[z]);
164         Serial.print("\n");
165       }
166       */
167
168     }
169     //Eteins les LEDs derrière la LED mouvante
170     leds[i + 1] = CRGB::Black;
171     delay(3);
172     leds[level * NUM_OF_LEDS_BY_LEVEL + NUM_OF_LEDS_BY_LEVEL / 2] = CRGB::Yellow;
173     leds[i] = color;
174     FastLED.show();
175     delay(delay_level);
176   }
177     leds[NUM_OF_LEDS_BY_LEVEL] = CRGB::Black;
178     FastLED.show();
179     delay(delay_level);
180   return 0;
181 }
182
183 void flash()   // fonction de décoration qui fait clignoter les leds en blanc avant le passage de niveau
184 {
185   for (int cpt = 0; cpt < 4; cpt++)
186   {
187     for (int i = NUM_OF_LEDS_BY_LEVEL * level; i <= (NUM_OF_LEDS_BY_LEVEL * level + NUM_OF_LEDS_BY_LEVEL - 1); i++)  // On met toute les leds du niveau en blanc
188     {
189       leds[i] = CRGB::Green;
190     }
191     FastLED.show();
192     delay(100);
193     for (int i = NUM_OF_LEDS_BY_LEVEL * level; i <= (NUM_OF_LEDS_BY_LEVEL * level + NUM_OF_LEDS_BY_LEVEL - 1); i++) // On éteint toutes les leds du niveau
194     {
195       leds[i] = CRGB::Black;
196     }
197     FastLED.show();
198     delay(100);
199   }
200   leds[last_point_visu] = CRGB::Purple;
201 }
202
203 void level_up()   // changement de niveau
204 {
205   flash();  // animation
206   level++;  // incrémentation de la variable niveau
207   delay_level -= 4; // le jeu devient de plus en plus rapide
208
209   if (level >= NUM_OF_LEVELS)   // fin du jeu
210   {
211     compute_score(); //Calcul le score
212     show_score(); //Affiche le score sur un écran à crystaux liquides
213
214     //Remise des valeurs pas défaut
215     level = 0;
216     score = 0;
217     delay_level = 30;
218     game_in_progress = false;
219     for(int w=0; w<NUM_OF_LEVELS;w++){
220       last_point[w] = 0;
221     }
222   }
223 }
224
225 void waiting_start_game(){
226   // Allume toutes les LEDs en bleu avant de faire commencer la partie
227   for (int w = 0; w < NUM_LEDS; w++){
228     leds[w] = CRGB::Blue;
229   }
230   FastLED.show();
231 }
232
233 int compute_score(){
234   // Récupere les élements du tableau last_point et les additionnes
235   for (int i = 0; i<NUM_OF_LEVELS; i++){
236     if (i > 2) {
237       // Pour les niveaux 4 et 5, le score est diviser par deux
238       score += last_point[i] / 2;
239     } else {
240       score += last_point[i];
241     }
242   }
243   // -------- DEBUGGING -------- //
244   /*
245   Serial.print("Score : ");
246   Serial.println(score);
247   */
248   return score;
249 }
250
251 int show_score(){
252   lcd.clear();
253   lcd.setCursor(0,0);
254   lcd.print("   Score : ");
255   lcd.print(score);
256   lcd.setCursor(0,1);
257   lcd.print("  Bien joue !!"); // Je ne sais pas comment mettre des caractères speciaux (hors ASCII 128)
258   delay(5000);
259   lcd.clear();
260   return 0;
261 }
262
263
264
265
266
267
268 // ----- MUSIQUE ----- //
269
270 int melody[] = {
271
272   //Based on the arrangement at https://www.flutetunes.com/tunes.php?id=169
273
274   NOTE_AS4,-2,  NOTE_F4,8,  NOTE_F4,8,  NOTE_AS4,8,//1
275   NOTE_GS4,16,  NOTE_FS4,16,  NOTE_GS4,-2,
276   NOTE_AS4,-2,  NOTE_FS4,8,  NOTE_FS4,8,  NOTE_AS4,8,
277   NOTE_A4,16,  NOTE_G4,16,  NOTE_A4,-2,
278   REST,1,
279
280   NOTE_AS4,4,  NOTE_F4,-4,  NOTE_AS4,8,  NOTE_AS4,16,  NOTE_C5,16, NOTE_D5,16, NOTE_DS5,16,//7
281   NOTE_F5,2,  NOTE_F5,8,  NOTE_F5,8,  NOTE_F5,8,  NOTE_FS5,16, NOTE_GS5,16,
282   NOTE_AS5,-2,  NOTE_AS5,8,  NOTE_AS5,8,  NOTE_GS5,8,  NOTE_FS5,16,
283   NOTE_GS5,-8,  NOTE_FS5,16,  NOTE_F5,2,  NOTE_F5,4,
284
285   NOTE_DS5,-8, NOTE_F5,16, NOTE_FS5,2, NOTE_F5,8, NOTE_DS5,8, //11
286   NOTE_CS5,-8, NOTE_DS5,16, NOTE_F5,2, NOTE_DS5,8, NOTE_CS5,8,
287   NOTE_C5,-8, NOTE_D5,16, NOTE_E5,2, NOTE_G5,8,
288   NOTE_F5,16, NOTE_F4,16, NOTE_F4,16, NOTE_F4,16,NOTE_F4,16,NOTE_F4,16,NOTE_F4,16,NOTE_F4,16,NOTE_F4,8, NOTE_F4,16,NOTE_F4,8,
289
290   NOTE_AS4,4,  NOTE_F4,-4,  NOTE_AS4,8,  NOTE_AS4,16,  NOTE_C5,16, NOTE_D5,16, NOTE_DS5,16,//15
291   NOTE_F5,2,  NOTE_F5,8,  NOTE_F5,8,  NOTE_F5,8,  NOTE_FS5,16, NOTE_GS5,16,
292   NOTE_AS5,-2, NOTE_CS6,4,
293   NOTE_C6,4, NOTE_A5,2, NOTE_F5,4,
294   NOTE_FS5,-2, NOTE_AS5,4,
295   NOTE_A5,4, NOTE_F5,2, NOTE_F5,4,
296
297   NOTE_FS5,-2, NOTE_AS5,4,
298   NOTE_A5,4, NOTE_F5,2, NOTE_D5,4,
299   NOTE_DS5,-2, NOTE_FS5,4,
300   NOTE_F5,4, NOTE_CS5,2, NOTE_AS4,4,
301   NOTE_C5,-8, NOTE_D5,16, NOTE_E5,2, NOTE_G5,8,
302   NOTE_F5,16, NOTE_F4,16, NOTE_F4,16, NOTE_F4,16,NOTE_F4,16,NOTE_F4,16,NOTE_F4,16,NOTE_F4,16,NOTE_F4,8, NOTE_F4,16,NOTE_F4,8
303
304 };
305
306 void musique(){
307   int tempo = 60;
308   // sizeof gives the number of bytes, each int value is composed of two bytes (16 bits)
309   // there are two values per note (pitch and duration), so for each note there are four bytes
310   int notes = sizeof(melody) / sizeof(melody[0]) / 2;
311
312   // this calculates the duration of a whole note in ms
313   int wholenote = (60000 * 2) / tempo;
314
315   int divider = 0, noteDuration = 0;
316   // iterate over the notes of the melody.
317   // Remember, the array is twice the number of notes (notes + durations)
318   for (int thisNote = 0; thisNote < notes * 2; thisNote = thisNote + 2) {
319
320     // calculates the duration of each note
321     divider = melody[thisNote + 1];
322     if (divider > 0) {
323       // regular note, just proceed
324       noteDuration = (wholenote) / divider;
325     } else if (divider < 0) {
326       // dotted notes are represented with negative durations!!
327       noteDuration = (wholenote) / abs(divider);
328       noteDuration *= 1.5; // increases the duration in half for dotted notes
329     }
330
331     // we only play the note for 90% of the duration, leaving 10% as a pause
332     tone(PIN_BUZZER, melody[thisNote], noteDuration*0.9);
333
334     // Wait for the specief duration before playing the next note.
335     delay(noteDuration);
336
337     // stop the waveform generation before the next note.
338     noTone(PIN_BUZZER);
339   }
340 }
étapes de fabrication
étape 1: câbler et souder
câbler les fils entre différents composants (selon le schéma) puis souder les fils si nécessaire et enfin téléverser le programme dans la carte si nécessaire.
étape 2: le support
réaliser le prototype en carton
étape 3 : support en bois
On réalise en suite le support en bois.
Grâce au prototype en carton on dessine le support en bois puis on reporte les mesures sur des plaques en bois pour ensuite les découper.
Une fois les différentes parties du support faites on les assemble.
troubleshouting
quelles sont difficultés, les problèmes, quelles sont les solutions, les trucs et astuces pour que ça marche ?
1er problème : le programme ne marchait pas car la LED était montée à l'envers
On a mit la led ans le bon sens puis on a adapté le programme.
2ème problème : adapter la taille du support qui était d'abord trop grand
On a utilisé le support en carton pour créer un support en bois plus petit.


