ENIB2020 :Random music instrument : Différence entre versions
(→Câblage capteur à ultrason) |
(→Câblage) |
||
| Ligne 21 : | Ligne 21 : | ||
=== Câblage capteur à ultrason === | === Câblage capteur à ultrason === | ||
[[Fichier:uson.jpg]] | [[Fichier:uson.jpg]] | ||
| + | |||
| + | === Définition des pins === | ||
| + | Modifier la définition des pins au début du code, pour correspondre à vos branchements. | ||
| + | |||
| + | <source lang ="C"> | ||
| + | // ======================================= PIN DEFINITION ======================================= | ||
| + | #define PIN_BUZZER 4 | ||
| + | #define PIN_USON_TRIG 10 | ||
| + | #define PIN_USON_ECHO 9 | ||
| + | #define PIN_LED_MASTER 7 | ||
| + | #define PIN_LED_SLAVE 13 | ||
| + | #define PIN_POTAR_TEMPO A1 | ||
| + | |||
| + | #if MASTER | ||
| + | #define PIN_JOYSTICK_X A2 | ||
| + | #define PIN_JOYSTICK_Y A3 | ||
| + | #define PIN_JOYSTICK_CENTER A0 | ||
| + | #endif | ||
| + | </source> | ||
== Programme == | == Programme == | ||
Version du 20 janvier 2020 à 14:52
Random music instrument
Le but de ce projet est de créer un instrument de musique numérique. L'instrument utilise la position des mains de l'utilisateur pour générer des notes. Le tempo et la gamme des notes sont réglables par l'utilisateur via des boutons.
Matériel
Ce projet est composé de deux modules similaires basés sur des arduinos nano, ils utilisent des capteurs ultrasons pour détecter la position des mains de l'utilisateur et des buzzers pour générer les notes. Les interfaces utilisateur sont partagés et utilisent un potentiomètre analogique un joystick.
Liste de matériel :
- Arduino nano x2
- Capteur ultrasons (HC-SR04) x2
- Buzzer x2
- Joystick
- Potentiomètre linéaire 10kΩ
- Led x2
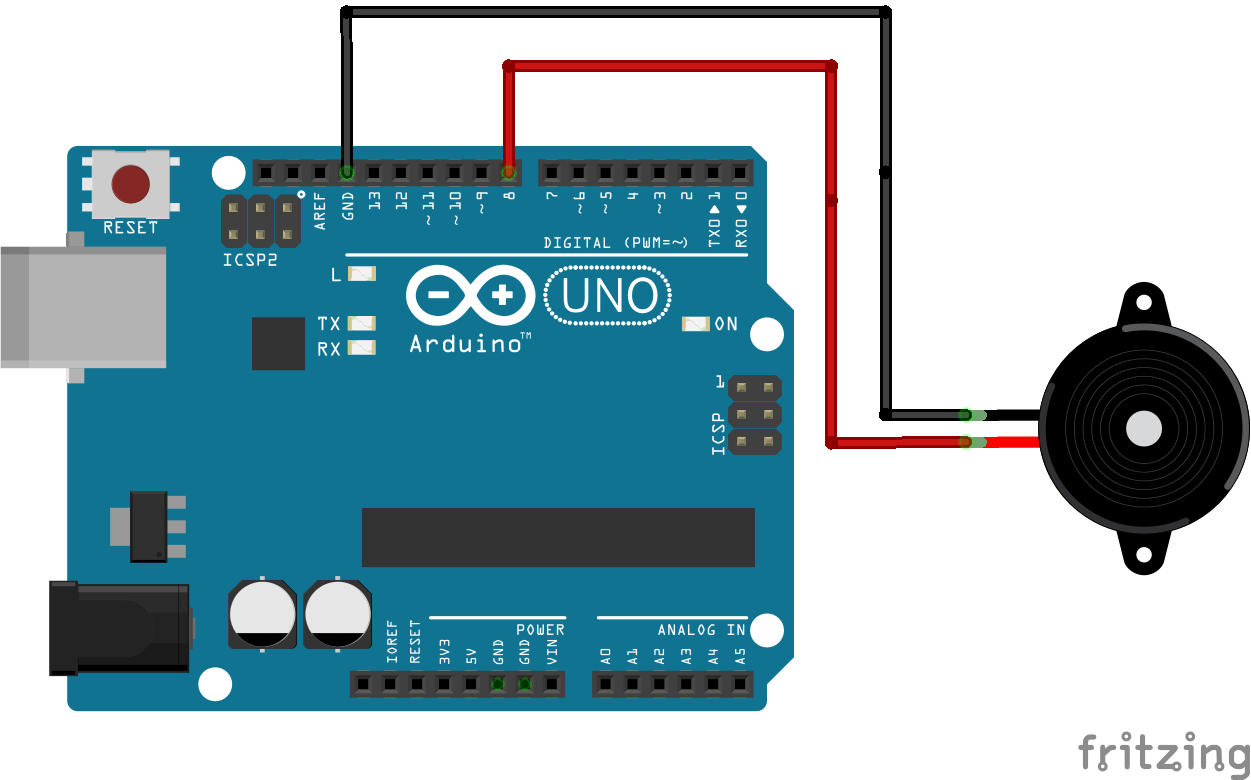
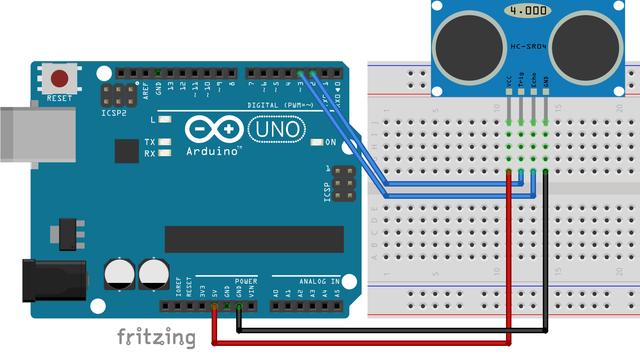
Câblage
Câblage buzzer
Câblage capteur à ultrason
Définition des pins
Modifier la définition des pins au début du code, pour correspondre à vos branchements.
// ======================================= PIN DEFINITION =======================================
#define PIN_BUZZER 4
#define PIN_USON_TRIG 10
#define PIN_USON_ECHO 9
#define PIN_LED_MASTER 7
#define PIN_LED_SLAVE 13
#define PIN_POTAR_TEMPO A1

#if MASTER
#define PIN_JOYSTICK_X A2
#define PIN_JOYSTICK_Y A3
#define PIN_JOYSTICK_CENTER A0
#endif
Programme
Les deux arduinos utilisent le même programme, seul un argument doit être changé afin de définir un maître et un esclave.
// Set value to 1 before send on the master arduino / Set value to 0 before send on the slave arduino
#define MASTER 0
Principe de génération des notes
L'instrument ne génère pas des sons aléatoirement, il utilise une note de référence dite fondamentale et monte dans la gamme sur une octave en fonction de la position de la main pour générer les notes de musique[1]. L'utilisateur peut sélectionner l'octave sur laquelle l'instrument fonctionne a l'aide du joystick, l'octave utilise la fondamentale comme référence. Les deux arduinos peuvent fonctionner sur deux octaves différentes mais la note fondamentale est une valeur fixé dans le programme, si l'utilisateur souhaite changer la fondamentale il est recommandé de la changer sur les deux arduinos afin que la musique reste cohérente.
int getNote(int n, int o)
{
  n = gamme[n % GAMME_COUNT];
  return 32.7f * pow(2, o + (n / 12.0f));
}
Détection des mains
Pour capter la position des mains de l'utilisateur on utilise des capteurs à ultrasons. Ils envoient des ultrasons et mesure le temps qu'il a fallu pour que le signal revienne vers lui (principe de l'ultrason).
// Return the distance detected by the ultrasonic sensor
float readUson()
{
  // Clears the trigPin
  digitalWrite(PIN_USON_TRIG, LOW);
  delayMicroseconds(2);
  // Sets the trigPin on HIGH state for 10 micro seconds
  digitalWrite(PIN_USON_TRIG, HIGH);
  delayMicroseconds(10);
  digitalWrite(PIN_USON_TRIG, LOW);
  // Reads the echoPin, returns the sound wave travel time in microseconds
  int duration = pulseIn(PIN_USON_ECHO, HIGH);
  // Calculating the distance
  return duration * 0.034 / 2;
}
Génération du son
On commence par tester si la distance est trop grande pour le capteur ou si le signal ne reviens pas, si ce n'est pas le cas on ordonne au buzzer de jouer à la fréquence calculé avec la fonction tone qui génère un signal carré à la fréquence demandée.
void play()
{
  // If there is no hand : play no sound.
  if (usonDistance > MAX_DISTANCE)
  {
    noTone(PIN_BUZZER); // Disable the sound.
    return;
  }
  int f = getNote(usonDistance / NOTE_RANGE, octave); // Get the frequancy of the note to play.
  tone(PIN_BUZZER, f); // play the note
}
Gérer le tempo
On a branché un potentiomètre 10kΩ, en le tournant on obtient un valeur entre 0 et 1023(0 à 5V) que l'on change à une valeur entre 50 et 400ms avec la fonction map.
// Return the delay to wait between each note following the position of the potentiometer.
int readDelay()
{
  return map(analogRead(PIN_POTAR_TEMPO), 0, 1023, 50, 400);
}
Lecture du joystick
Pour lire les valeurs du joystick on a juste à lire les 3 broches du joystick qui gèrent respectivement l'axe X, l'axe Y et l'appui du joystick. Si la valeur est au dessus d'un certain seuil on considère qu'il y a une action.
// Return the joystick state
int readJoystick()
{
  int v = analogRead(PIN_JOYSTICK_X);
  if (v > JS_TRIG_HIGH)
    return JS_UP;
  if (v < JS_TRIG_LOW)
    return JS_DOWN;

  v = analogRead(PIN_JOYSTICK_Y);
  if (v > JS_TRIG_HIGH)
    return JS_RIGHT;
  if (v < JS_TRIG_LOW)
    return JS_LEFT;

  if (analogRead(PIN_JOYSTICK_CENTER) < JS_TRIG_LOW)
    return JS_CENTER;

  return JS_NONE;
}
Selectionner un buzzer
Dans le loop on verifie les mouvements sur le joystick et en fonction des mouvement soit on choisis le buzzer sélectionné soit on change les octaves soit on arrête le son d'un buzzer.
switch (joystick)
{
  case JS_RIGHT: isMasterSelected = true; break;
  case JS_LEFT: isMasterSelected = false; break;
  case JS_UP: octavePlus(); break;
  case JS_DOWN: octaveMinus(); break;
  case JS_CENTER: switchOnOff(); break;
}
Monter ou descendre la gamme d'un buzzer
Si la carte maître est séléctionné alors on a juste à changer la variable que l'on utilise dans le calcule de la fréquence. Si on veut modifier la carte esclave alors on utilise le serial.write pour envoyer un message. De la broche Tx du maître vers la broche Rx de l'esclave.
// Increase the octave if selected else send the command to slave.
void octavePlus()
{
  if (isMasterSelected)
  {
    if (octave == MAX_OCTAVE)
      return;
    octave++;
  }
  else
  {
    if (slaveOctave == MAX_OCTAVE)
      return;
    slaveOctave++;
    Serial.write(CMD_OCTAVE_PLUS);
  }
}

// Decrease the octave if selected else send the command to slave.
void octaveMinus()
{
  if (isMasterSelected)
  {
    if (octave == MIN_OCTAVE)
      return;
    octave--;
  }
  else
  {
    if (slaveOctave == MIN_OCTAVE)
      return;
    slaveOctave--;
    Serial.write(CMD_OCTAVE_MINUS);
  }
}
Allumer ou éteindre les buzzer
Sur l'appui d'un bouton, on change la variable qui gère de couper le sons et on utilise serial.write pour envoyer le message à l'esclave.
// Switch the state of isOn flag and send the command to slave.
void switchOnOff()
{
  isOn ^= true;
  Serial.write(CMD_ON_OFF);
}
Communication entre les arduinos
L'instrument utilise un seul joystick pour commander les deux arduinos, ceux ci sont donc connectés par l'intermédiaire d'une connexion série. Les deux arduinos sont dans une configuration maître esclave, le joystick est connecté au maître qui envoie les commandes à l'esclave lorsqu'elles lui sont destinées. Les commandes sont envoyés sous forme de valeurs numériques entières définies dans le programme.
Code entier
// Set value to 1 before send on the master arduino / Set value to 0 before send on the slave arduino
#define MASTER 0

// ======================================= SETTINGS DEFINITION =======================================
#define NOTE_RANGE 5 // Sensitivity to detect the note to play
#define MAX_DISTANCE 100
#define DEFAULT_OCTAVE 2
#define MIN_OCTAVE 0
#define MAX_OCTAVE 5

#if MASTER
// Joystick sensitivity.
#define JS_TRIG_HIGH 900
#define JS_TRIG_LOW 100
#endif

// ======================================= PIN DEFINITION =======================================
#define PIN_BUZZER 4
#define PIN_USON_TRIG 10
#define PIN_USON_ECHO 9
#define PIN_LED_MASTER 7
#define PIN_LED_SLAVE 13
#define PIN_POTAR_TEMPO A1

#if MASTER
#define PIN_JOYSTICK_X A2
#define PIN_JOYSTICK_Y A3
#define PIN_JOYSTICK_CENTER A0
#endif

// ======================================= CONSTANTE DEFINITION =======================================
#define CMD_OCTAVE_PLUS 1
#define CMD_OCTAVE_MINUS 2
#define CMD_ON_OFF 3

#define JS_NONE 0
#define JS_LEFT 1
#define JS_RIGHT 2
#define JS_UP 3
#define JS_DOWN 4
#define JS_CENTER 5

#define GAMME_COUNT 7
const int gamme[] = { 0, 2, 4, 5, 7, 9, 11 };

// ======================================= VARIABLES =======================================
int usonDistance;
int octave = DEFAULT_OCTAVE;
bool isOn = true;

#if MASTER
bool isMasterSelected = true;
int joystick = JS_NONE;
int lastJoystick = JS_NONE;
int slaveOctave = DEFAULT_OCTAVE;
#else
int inputCmd;
#endif

// ======================================= CODE =======================================

void setup()
{
  // Set pin mode.
  pinMode(PIN_BUZZER, OUTPUT);
  pinMode(PIN_USON_TRIG, OUTPUT);
  pinMode(PIN_USON_ECHO, INPUT);
  pinMode(PIN_POTAR_TEMPO, INPUT);

#if MASTER
  pinMode(PIN_LED_MASTER, OUTPUT);
  pinMode(PIN_LED_SLAVE, OUTPUT);

  pinMode(PIN_JOYSTICK_X, INPUT);
  pinMode(PIN_JOYSTICK_Y, INPUT);
  pinMode(PIN_JOYSTICK_CENTER, INPUT);
#endif

  Serial.begin(9600); // Enable serial.
}

void loop()
{
#if MASTER
  // Execute action from joystick input.
  joystick = readJoystick();
  if (lastJoystick != joystick) // Check if joystick have change position since the last frame.
  {
    lastJoystick = joystick;
    switch (joystick)
    {
      case JS_RIGHT: isMasterSelected = true; break;
      case JS_LEFT: isMasterSelected = false; break;
      case JS_UP: octavePlus(); break;
      case JS_DOWN: octaveMinus(); break;
      case JS_CENTER: switchOnOff(); break;
    }
  }

  setLeds();
#else
  // Read data from master via Serial and execute the command.
  if (Serial.available() > 0)
  {
    inputCmd = Serial.read();
    switch (inputCmd)
    {
      case CMD_OCTAVE_PLUS: octave++; break;
      case CMD_OCTAVE_MINUS: octave--; break;
      case CMD_ON_OFF: isOn ^= true; break;
    }
  }
#endif

  // Check if the system is on.
  if (!isOn)
  {
    noTone(PIN_BUZZER); // Disable the sound.
    return;
  }

  usonDistance = readUson(); // Read the distance between the ultrasic sensor and the hand.
  play(); // Play the note
  delay(readDelay()); // Wait to make the tempo.
}

void play()
{
  // If there is no hand : play no sound.
  if (usonDistance > MAX_DISTANCE)
  {
    noTone(PIN_BUZZER); // Disable the sound.
    return;
  }
  int f = getNote(usonDistance / NOTE_RANGE, octave); // Get the frequancy of the note to play.
  tone(PIN_BUZZER, f); // play the note
}

int getNote(int n, int o)
{
  n = gamme[n % GAMME_COUNT];
  return 32.7f * pow(2, o + (n / 12.0f));
}

// Return the delay to wait between each note following the position of the potentiometer.
int readDelay()
{
  return map(analogRead(PIN_POTAR_TEMPO), 0, 1023, 50, 400);
}

// Return the distance detected by the ultrasonic sensor
float readUson()
{
  // Clears the trigPin
  digitalWrite(PIN_USON_TRIG, LOW);
  delayMicroseconds(2);
  // Sets the trigPin on HIGH state for 10 micro seconds
  digitalWrite(PIN_USON_TRIG, HIGH);
  delayMicroseconds(10);
  digitalWrite(PIN_USON_TRIG, LOW);
  // Reads the echoPin, returns the sound wave travel time in microseconds
  int duration = pulseIn(PIN_USON_ECHO, HIGH);
  // Calculating the distance
  return duration * 0.034 / 2;
}

#if MASTER

void setLeds()
{
  digitalWrite(PIN_LED_MASTER, isMasterSelected ? 1 : 0);
  digitalWrite(PIN_LED_SLAVE, isMasterSelected ? 0 : 1);
}

// Return the joystick state
int readJoystick()
{
  int v = analogRead(PIN_JOYSTICK_X);
  if (v > JS_TRIG_HIGH)
    return JS_UP;
  if (v < JS_TRIG_LOW)
    return JS_DOWN;

  v = analogRead(PIN_JOYSTICK_Y);
  if (v > JS_TRIG_HIGH)
    return JS_RIGHT;
  if (v < JS_TRIG_LOW)
    return JS_LEFT;

  if (analogRead(PIN_JOYSTICK_CENTER) < JS_TRIG_LOW)
    return JS_CENTER;

  return JS_NONE;
}

// Increase the octave if selected else send the command to slave.
void octavePlus()
{
  if (isMasterSelected)
  {
    if (octave == MAX_OCTAVE)
      return;
    octave++;
  }
  else
  {
    if (slaveOctave == MAX_OCTAVE)
      return;
    slaveOctave++;
    Serial.write(CMD_OCTAVE_PLUS);
  }
}

// Decrease the octave if selected else send the command to slave.
void octaveMinus()
{
  if (isMasterSelected)
  {
    if (octave == MIN_OCTAVE)
      return;
    octave--;
  }
  else
  {
    if (slaveOctave == MIN_OCTAVE)
      return;
    slaveOctave--;
    Serial.write(CMD_OCTAVE_MINUS);
  }
}

// Switch the state of isOn flag and send the command to slave.
void switchOnOff()
{
  isOn ^= true;
  Serial.write(CMD_ON_OFF);
}

#endif


